The worst time to learn your cameras don’t work well at night is right after something happens. You pull up the clip expecting a clear face or license plate—and instead you get glare, haze, smearing, or soft blobs that don’t help. In that moment, the question isn’t “Do I need better cameras?” It’s “Why is this happening, and what’s the fastest way to fix it?”
You’ve got a blurry security camera…
This guide is designed for exactly that scenario: a recent incident exposed unusable nighttime footage. We’ll narrow your “blurry security camera at night” problem into a specific type of blur, then walk through the most common causes—placement, IR reflections, low light, lens/housing issues, and Wi-Fi compression—with practical tests and fixes you can apply without guesswork.
First, name the blur: haze, glare, or motion smear?
“Blurry at night” is a catch-all phrase. But the fix depends on what the footage actually looks like. The same camera can produce three completely different failure modes after dark, and each points to a different cause.
The quick 60-second test: pause-frame clues that tell you what’s happening
Pull up one nighttime clip from your problem camera and do this:
- Pause on a still moment (when nothing is moving)
- Pause during motion (a person walking, a car passing)
- Compare bright areas vs dark areas (porch light, headlights, streetlights)
Now look for these clues:
- Haze / fog / “milky” look across the whole image
Often points to IR reflection, dirt/film on a lens or dome, condensation, or shooting through glass. - Glare / blown-out highlights (a bright blob where a light should be)
Often points to lighting placement, angle, or the camera being too close to a light source. - Motion smear (people and cars look like soft streaks, but the background looks okay)
Often points to low light forcing settings that reduce motion clarity, or a scene that’s too wide and too far.
If you can name the blur, you can stop treating this like a random quality issue and start fixing the real cause.
Why “blurry” at night is usually one of three problems
Most nighttime footage issues come down to one of these realities:
- The camera is fighting its own night vision (IR light reflecting off nearby surfaces, glass, dirt, or a dome).
- The scene is too dark for the moment you care about (so the camera prioritizes brightness and loses crisp detail).
- The subject is moving and the camera can’t freeze it (especially in low light, where clarity is traded for visibility).
It’s rarely “the camera is broken.” It’s usually “the scene and setup are asking the camera to do something it can’t do cleanly at night.”
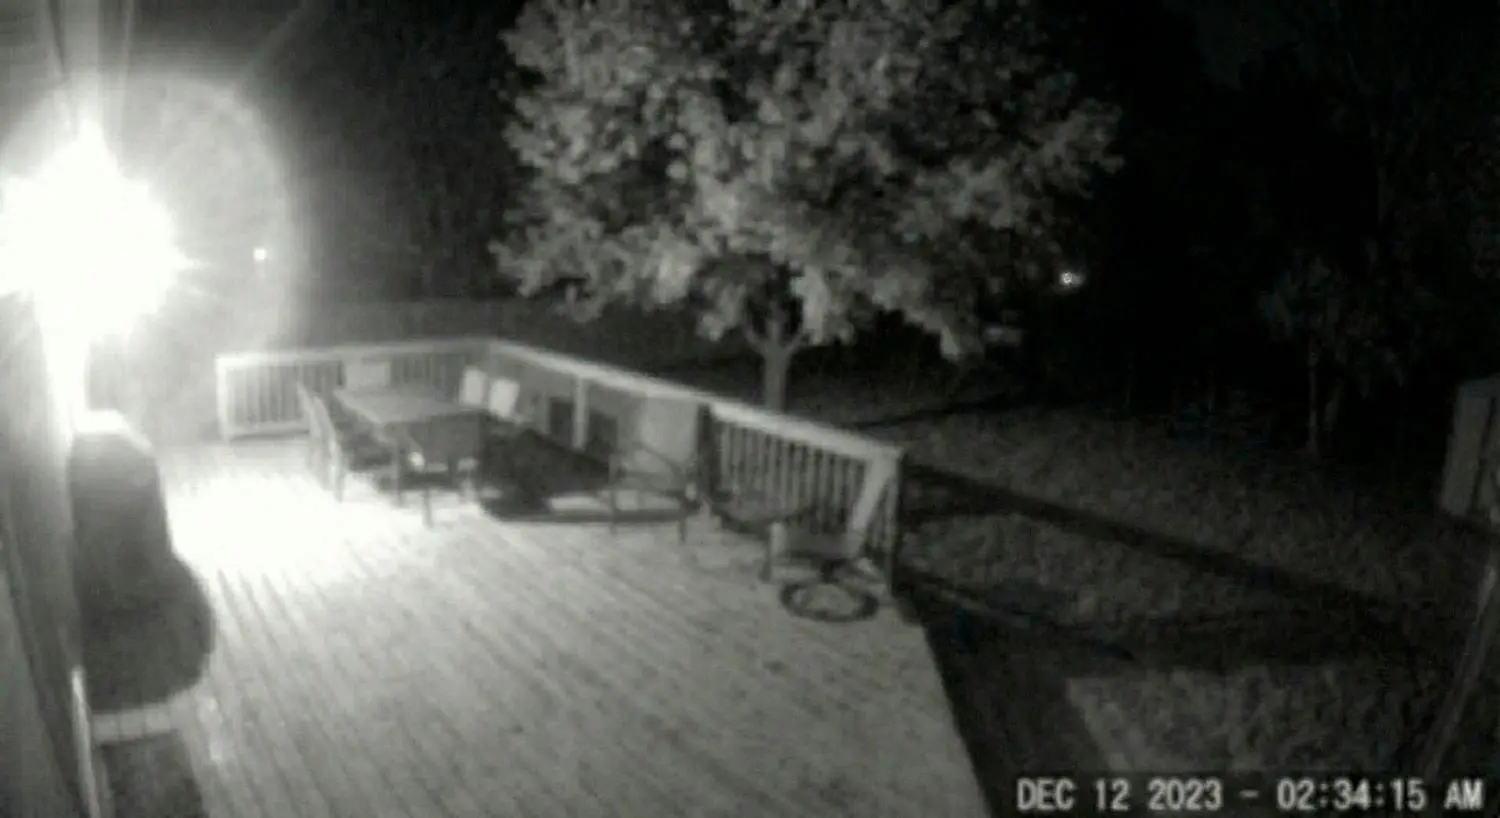
The most common cause: IR reflection and bad placement
If you only check one thing first, check this. IR reflection is one of the most common reasons why security camera footage is blurry at night even when it looks fine during the day.
IR (infrared) night vision works by emitting invisible light and capturing the reflection. When that IR light bounces off the wrong surface—too close, too reflective, too dirty—the camera essentially blinds itself.
Cameras under eaves, near walls, or behind glass (the IR bounce-back problem)
Common placements that create IR bounce-back:
- Mounted too close to an exterior wall or soffit (the IR hits the wall and reflects back into the lens)
- Aimed along a wall instead of away from it (the wall becomes a giant reflector)
- Behind glass (a window reflection can dominate the image at night)
- Inside an enclosure with reflective surfaces nearby (even trim and glossy paint can contribute)
The result often looks like: foggy haze, loss of contrast, and a “glow” around edges.
Fast test:
At night, temporarily turn off the camera’s IR (if your app allows) and see if the haze changes. If the haze reduces or the image suddenly looks “clearer but darker,” you’re likely dealing with IR reflection. (You may not keep IR off long-term, but it’s a helpful diagnostic.)
Spiders, dust, and water spots you don’t notice until IR hits them
Here’s the annoying truth: tiny things that are invisible in daylight become giant problems when IR lights them up.
Common culprits:
- Spiders and webs near the camera (IR makes them glow like white streaks)
- Dust film or pollen on the lens/dome
- Water spots from sprinklers, rain splash, or cleaning residue
- Micro-scratches on domes that scatter IR
If your footage looks “foggy” or “sparkly,” especially close to the camera, you might not be seeing the yard—you might be seeing illuminated debris.
Fast test:
Use a flashlight and look at the camera lens/dome from the side. If you see streaks, spots, or a cloudy film, clean it properly (microfiber cloth, gentle lens-safe cleaner), then re-check footage.
The fix path: reposition, add standoff, change angle, reduce nearby reflectors
IR problems are often solved by small changes that feel almost too simple:
- Reposition the camera slightly away from walls/eaves so nearby surfaces aren’t in the IR flood zone
- Use a small standoff mount so the camera sits farther from the mounting surface
- Change the angle so the camera isn’t “seeing” the wall as a major part of the scene
- Avoid shooting through glass whenever possible; if you must, disable IR and add external lighting instead
- Trim back objects near the lens (plants, decorations, shiny house numbers) that reflect IR
You don’t need perfect. You need “IR isn’t blinding the camera.” Once that’s true, everything else becomes easier to improve.
Not enough light (and why “night vision” isn’t magic)
Even good night vision has limits. Cameras can “see” in low light, but that doesn’t mean they can capture crisp, usable detail—especially at the distances homeowners expect.
This is why cameras can show a visible person-shaped object at night, but still fail to capture an identifiable face or clothing detail.
How low light forces slower shutter / more noise (in plain English)
In low light, cameras need more light to form a clear image. They typically respond by:
- Letting in light longer (which can blur motion)
- Amplifying the signal (which can add noise and reduce detail)
The camera is trying to produce a brighter picture, and sometimes it succeeds—but the “brightness” comes with a tradeoff: less crispness, especially on moving subjects.
You’ll notice this when:
- still objects look okay
- moving subjects smear or look soft
- the image looks grainy or “muddy”
When a small lighting change beats a camera upgrade
If your key area is a driveway, porch, or gate, adding or improving lighting can do more for nighttime clarity than replacing cameras—especially if the camera placement is otherwise decent.
A small lighting change helps when:
- your scene is very dark except for the camera’s IR
- headlights or porch lights are creating harsh contrast
- motion blur is a consistent problem
The goal isn’t to make your yard look like a stadium. It’s to create enough consistent, even light that the camera doesn’t have to “struggle” with extreme darkness and extreme highlights.
Practical lighting upgrades that don’t create glare
Bad lighting can make footage worse. The best lighting for cameras tends to be:
- Even and indirect (not blasting directly into the lens)
- Placed to illuminate faces and approach paths rather than the camera itself
- Consistent (so the camera isn’t constantly adapting)
Practical options:
- Add a light that illuminates the area from the side, not from directly above the camera
- Reduce harsh hot spots (a bright bulb right next to the camera) and aim for wider coverage
- Use lighting that turns on predictably (dusk-to-dawn or scheduled), not only motion-triggered
Motion lights can help—but if they trigger too late, you’ll still miss the moment you care about. And if they shine into the camera, you’ll get glare.
Motion blur: settings and scene design that trade clarity for brightness
Nighttime footage often fails during motion—exactly when you need it. The fix is partly settings, but more often it’s scene design: distance, angle, and how much area the camera is trying to cover.
Fast subjects + low light = smear (people, cars, pets)
If your clip shows:
- a sharp background
- but people look like soft ghosts
- or cars smear as they pass
That’s classic low-light motion blur. The camera is prioritizing a usable image in darkness, and motion is the cost.
This is common in:
- driveways (cars move fast and headlights create contrast)
- porches (people approach quickly)
- side gates (fast pass-through zones)
When to adjust exposure, frame rate, or “motion” settings (without getting technical)
Most consumer systems expose a few simple controls. Names vary, but the tradeoffs are similar:
- If you increase brightness too much, motion can blur more.
- If you increase “night clarity” or similar features, you may also increase noise or smoothing.
- If you enable aggressive noise reduction, moving details can look smeared.
A practical approach:
- Start by returning to “default” or “balanced” mode.
- Make small changes one at a time.
- Re-test on a real scene (someone walking the path, a car pulling in).
If your app has an “anti-flicker,” “WDR,” or “backlight” option, it may help with harsh contrast near porch lights or headlights, but it won’t fix IR reflection or a dirty dome.
Scene design: narrowing the view, reducing distance, and improving angles
This is the biggest missed lever. Many cameras are asked to do too much: cover a wide area from far away and still capture detail.
Better results often come from:
- Narrowing the view to the most important path (front steps, gate entrance)
- Reducing distance between camera and subject area
- Improving angle so you’re not looking down from too high, or shooting into bright lights
If your goal is identifying a person at the porch, a camera covering the entire yard might not be the best tool. A second camera focused on the approach path can do more than a single “do-it-all” camera.
Lens and housing issues: foggy domes, condensation, and focus drift
Sometimes the blur isn’t the scene—it’s the camera’s physical condition. This is especially true when the camera looks decent in daytime but turns milky at night.
Dome cameras: why they look “milky” at night even when clean
Dome housings can be great in the right spots, but they can also scatter IR light. Even when you clean them, a dome can develop:
- micro-scratches
- a hazy film
- residue from improper cleaning
- tiny imperfections that catch IR
At night, that scattering can look like soft fog or reduced contrast. It’s not always obvious until IR kicks in.
Fast test:
Compare footage from a dome camera to a nearby non-dome camera (if you have one). If the dome consistently looks “softer” at night, the housing may be a contributing factor.
Condensation and temperature swings (what to check)
If your camera looks foggy only at certain times (early morning, after rain, or during temperature swings), condensation may be involved.
What to check:
- does the fog appear and disappear with weather changes?
- is the camera exposed to sprinklers or heavy splash?
- is there a seal or housing issue allowing moisture intrusion?
You don’t need to diagnose the exact physics. You need to notice patterns—because a pattern tells you whether you’re dealing with the environment, not the network or settings.
When a camera is simply the wrong form factor for the spot
Some locations are just unfriendly to certain camera types:
- tight eaves with nearby walls (IR reflection risk)
- glass-front placements (window reflections)
- high-exposure weather zones (condensation, rain splash)
- very wide scenes where you actually need a tighter, purpose-driven view
This is where a professional design approach can save money. Replacing a camera with the same placement and the same scene problems often produces the same disappointment.
Wi-Fi and bandwidth: when the image is “blurry” because it’s compressed
This one surprises people: sometimes the camera is fine, but the video you’re seeing is compressed because the connection can’t sustain quality.
This can make footage look soft, blocky, or “muddy,” especially at night when scenes are harder to encode and motion triggers higher data demands.
How weak Wi-Fi creates dropped quality and stuttering at night
Wi-Fi problems don’t always show up as “disconnected.” They can show up as:
- video that plays but looks worse
- stuttering during motion
- quality that changes during the clip
- delayed loading and frequent buffering
A camera may lower video quality to keep a stable stream and recording. Night footage can stress systems more because:
- low-light noise can make compression less efficient
- motion events increase data demands
- more cameras may be active at night (motion triggers)
Signs your camera is lowering bitrate/resolution automatically
Clues include:
- daytime footage looks sharper than night, even in similar lighting
- the video looks “blocky” rather than simply out of focus
- detail disappears during motion
- the clip looks worse when viewed live vs downloaded (depending on system)
If you suspect this, don’t rely only on Wi-Fi “bars.” The real test is stability and throughput where the camera lives.
Fixes: access points, wired backhaul, PoE, and better network design
Practical improvements that often help:
- add or reposition Wi-Fi access points closer to camera zones
- improve the wired backbone feeding your access points (wired backhaul)
- consider wired camera approaches where feasible (including PoE—Power over Ethernet)
- reduce network congestion and interference in key areas
You don’t have to redesign the entire home network to solve one camera problem. But if multiple cameras struggle at night, it’s often a system-level network issue, not a camera-by-camera issue.
The contrarian moment: more “4K” doesn’t fix a bad scene
When someone sees blurry footage after an incident, the instinct is: “I need higher resolution.” It’s understandable—but often wrong.
Resolution helps when the scene is already well designed: reasonable distance, good lighting, good angle, stable connection. When those foundations are missing, “more 4K” just gives you a sharper view of the same problems.
Why distance + lighting + angle matter more than specs
Think of a camera like any optical tool: it can’t capture detail that never reaches the lens clearly.
Night clarity depends heavily on:
- how far the subject is from the camera
- whether the area is evenly lit
- whether IR is being reflected back into the lens
- whether motion can be frozen in available light
A high-resolution camera pointed at a dark driveway from too far away can still produce unusable footage. A well-placed camera with adequate lighting often beats a spec upgrade.
The upgrade checklist: what to improve before you replace cameras
Before replacing anything, try to fix in this order:
- Clean and inspect lens/housing
- Check for IR reflection (walls, eaves, glass, nearby objects)
- Improve lighting conditions without creating glare
- Adjust placement and angle for the goal (faces, packages, vehicles)
- Verify network stability and recording quality
- Only then consider camera upgrades—based on what your scene truly needs
This sequence prevents the most common waste: buying new cameras to solve a placement and lighting problem.
A practical troubleshooting checklist for tonight
If you’re reading this because something just happened and you want better footage immediately, this is a “do it tonight” plan. It won’t solve every scenario instantly, but it will identify the biggest causes quickly.
Step-by-step: clean + test, lighting check, angle check, network check
- Clean properly
- Use a microfiber cloth and lens-safe cleaner.
- Remove water spots and film.
- Inspect for scratches or cloudy domes.
- Check IR reflection
- Look for nearby walls, soffits, glass, or reflective objects in frame.
- If possible, test with IR off briefly to see if haze changes.
- Remove or reposition reflective objects near the lens.
- Check lighting
- Turn on porch/driveway lighting and observe glare.
- If a light is blowing out the image, reposition the camera angle away from direct glare or adjust lighting placement.
- Aim for even light on the approach path rather than a bright bulb near the camera.
- Check the angle and distance
- If the camera is high and wide, consider focusing the view more tightly on the key zone.
- Make sure you’re not asking one camera to cover an entire yard and also identify a face at the porch.
- Check network health
- View and download a clip if your system allows. Compare quality.
- If quality fluctuates or becomes blocky, consider Wi-Fi improvements or wired options.
- Re-test with a real scenario
- Walk the path a person would take.
- Drive a car into the driveway.
- Review the footage immediately.
You’re not looking for perfection. You’re looking for meaningful improvement and a clear diagnosis of what’s limiting you.
What “good enough” looks like for your goal (faces, packages, vehicles)
Night clarity should be judged against what you actually need:
- Packages at the porch: you need a clear view of the drop zone and approach path; you may not need a wide yard shot.
- Faces: you typically need appropriate angle, distance, and lighting—especially on the approach route.
- Vehicles: you need stable exposure and good lighting; headlights and distance can reduce usefulness quickly.
If your goal is identification, design for identification. If your goal is general awareness, you can accept a wider view and less detail. The mistake is expecting one camera view to accomplish both.
Next steps: how to get footage you can actually use
Once you’ve identified the likely cause, the best next step is to document what you’re seeing so you can solve it cleanly—either on your own or with help.
Document your trouble spots (3 clips + 3 photos) before a consult
If you want a fast, accurate diagnosis, collect:
- 3 short clips: one with motion, one with still scene, one showing the problem moment
- 3 photos of the camera location: include what it’s mounted near (wall, eave, light fixture, glass)
- Notes on timing: “looks bad after rain,” “worst at dusk,” “glare when porch light is on”
This turns the conversation from “it’s blurry” to “this is IR reflection from the soffit” or “this is low-light motion smear in the driveway.”
How AVI Group can design a reliable camera + network plan (soft CTA)
If a real incident exposed unusable night footage, you don’t need guesses—you need a clear fix path. AVI Group can review your camera views, lighting conditions, and network constraints to identify what’s limiting clarity. Book a free consultation and we’ll start with your trouble clips and a simple plan to improve the most important angles first.
Phased improvements: fix the top 1–2 views first, then expand
You don’t have to overhaul everything at once. A smart approach is:
- fix the most important camera views first (front porch, driveway, gate)
- confirm the improvement with real-world testing
- expand only when the core views are delivering usable footage
This reduces cost, reduces complexity, and rebuilds trust in the system—because it starts with the places where you most need reliability.
FAQ
Why is my security camera footage blurry at night?
It’s usually one of three issues: IR reflection (night vision bouncing off nearby surfaces or glass), low light (the camera prioritizes brightness and loses crisp detail), or motion blur (moving subjects smear in low light). Lens/housing condition and Wi-Fi compression can also contribute.
Why do my cameras look foggy or hazy only at night?
Night haze often comes from IR light reflecting back into the lens—off walls, eaves, glass, dirt, water spots, or dome housings. It can also be caused by condensation or a hazy film that becomes obvious when IR illuminates it.
What’s the best placement for night vision security cameras?
Night placement is usually better when the camera has a clear view of the target area without being too close to walls, eaves, or reflective surfaces. Avoid shooting through glass, and aim for angles that capture approach paths at reasonable distance rather than trying to cover an entire yard from far away.
How can I improve security camera night clarity without replacing the camera?
Start with the fast fixes: clean the lens/housing, check for IR reflection, adjust angle or use a standoff mount, improve lighting evenly (without shining into the lens), and verify network stability. Often these changes improve clarity more than a camera swap.
Does Wi-Fi affect security camera quality at night?
Yes. If the connection struggles, some systems reduce video quality to keep the stream stable, which can look like “blurry” footage due to compression. Weak Wi-Fi can also cause stuttering and quality drops during motion events.
Should I add lights, or will that ruin night vision?
Lighting can help significantly when it’s even and not aimed into the camera. Poorly placed lights can create glare and blow out highlights. The goal is consistent illumination on the area you care about—porch steps, driveway entry, gate path—so the camera doesn’t have to rely only on IR.
If a real incident exposed unusable night footage, you don’t need guesses—you need a clear fix path.
AVI Group can review your camera views, lighting conditions, and network constraints to identify what’s limiting clarity.
Book a free consultation and we’ll start with your trouble clips and a simple plan to improve the most important angles first.
RELATED LINKS:
ONVIF — Media Service Specification (encoder configs, profiles, bitrate/resolution concepts)